This article is about
CapCut - Download
ByteDance Pte. Ltd. · Education
How to Add Keyframes in CapCut on Android: Beginner's Guide
GetApkFree Team
Learn how to add keyframes in CapCut on Android to animate photos, move text, create smooth zoom effects, and fix common keyframe problems.
- Version
- Latest
- Source
- Google Play
- Package
- external.capcut.en.softonic.com.capcut-download
How to Add Keyframes in CapCut on Android: Beginner's Guide
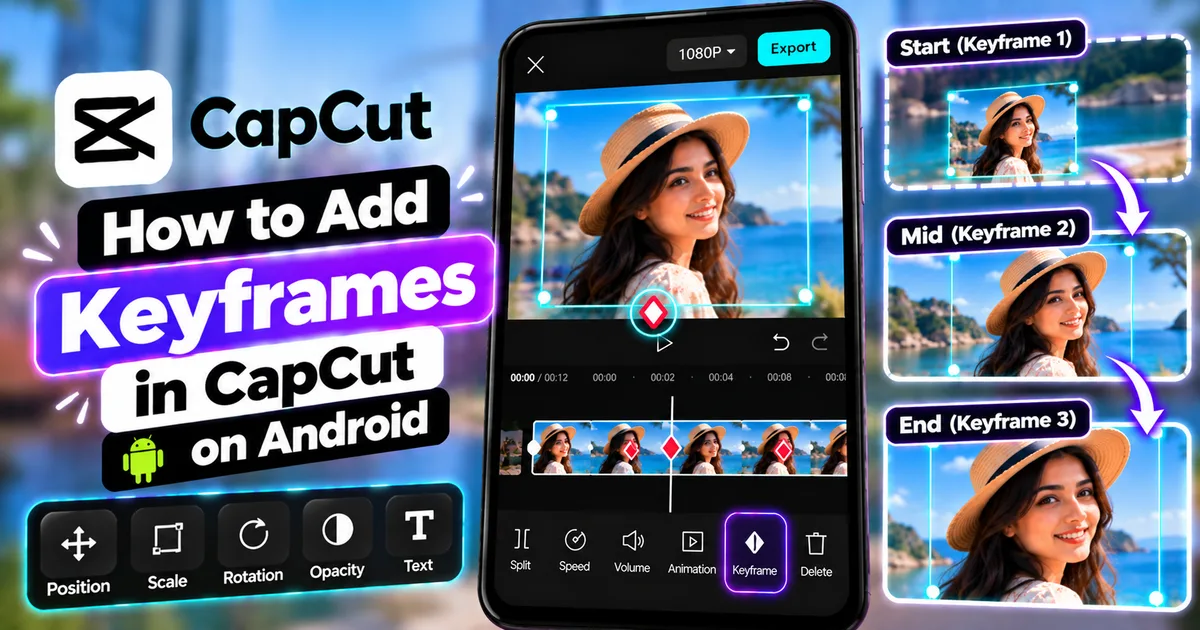
Keyframes are one of the most useful tools for creating custom animations in CapCut. They let you control how a video, photo, or other editable element changes over time.
For example, you can use keyframes to gradually zoom into a photo, move an image across the screen, or create a smooth camera-like movement without recording new footage.
The basic idea is simple: choose a starting point, choose an ending point, and tell CapCut how the selected element should look at each point.
CapCut then creates the movement between those points.
In this guide, you'll learn how to add keyframes in CapCut on Android, create your first zoom animation, animate photos and overlays, and troubleshoot common problems.
What Is a Keyframe in CapCut?
A keyframe is a point on the editing timeline that stores a particular value or state.
For example, imagine you want a photo to slowly zoom in over three seconds.
At the beginning, the photo is displayed at its normal size.
Three seconds later, you want it to appear larger.
You can create two keyframes:
- First keyframe: normal photo size.
- Second keyframe: enlarged photo size.
CapCut calculates the transition between those two states.
When you play the video, the photo gradually becomes larger instead of suddenly jumping to the new size.
This is the basic principle behind keyframe animation.
What Can You Animate With Keyframes?
Depending on the selected element and the controls available in your CapCut version, keyframes can help you animate properties such as:
- Position
- Scale or size
- Rotation
- Opacity
- Movement of images or overlays
You can use these properties to create a wide range of visual effects.
For beginners, the easiest starting point is a simple zoom animation.
Once you understand that process, you can apply the same principle to other supported properties.
How to Add Keyframes in CapCut on Android
Follow these steps to create your first keyframe animation.
Step 1: Open CapCut
Launch the CapCut app on your Android phone.
Open an existing project or create a new one.
If you're starting from scratch, tap New project and select a video or photo from your gallery.
Add the media to your editing timeline.
Step 2: Select the Clip
Tap the video or photo in the timeline.
Make sure the correct clip is selected.
Keyframe controls generally appear when you're editing a compatible element rather than simply viewing the project.
Step 3: Move the Playhead
Move the timeline playhead to the point where you want the animation to begin.
For example, if you want a zoom to start at the beginning of the clip, move the playhead to the clip's first frame.
Step 4: Add the First Keyframe
Look for the keyframe control, commonly represented by a diamond-shaped icon.
Tap it to create your first keyframe.
This establishes the starting state of the selected element.
For a basic zoom animation, leave the image at its original size.
Step 5: Move to the Ending Point
Move the playhead forward to the point where the animation should finish.
For example, move it three seconds forward.
The distance between the starting and ending keyframes determines how long the animation takes.
Step 6: Change the Image Size or Position
With the playhead at the ending point, enlarge or reposition the selected image.
For a zoom effect, use two fingers on the preview to increase the image's size.
Depending on your CapCut version, changing the supported property may create a new keyframe automatically. If it does not, use the keyframe control to establish the ending state.
You should now have a starting keyframe and an ending keyframe.
Step 7: Preview the Animation
Move the playhead back to the beginning and press Play.
The image should gradually move or zoom between the two keyframes.
If the animation is too fast, increase the time between the keyframes.
If it is too slow, move the keyframes closer together.
That's your first CapCut keyframe animation.
How to Create a Smooth Zoom-In Effect
A slow zoom can make a static photo feel more dynamic.
For example, imagine a landscape photo showing mountains and a lake.
You want the video to begin with the entire landscape and gradually zoom toward the mountain.
Here's how to create that effect.
- Add the landscape photo to your CapCut project.
- Select the photo in the timeline.
- Move the playhead to the beginning.
- Add the first keyframe.
- Keep the photo at its original size.
- Move the playhead toward the end of the photo.
- Enlarge the photo slightly.
- Reposition it so the mountain remains visible.
- Preview the result.
The image should gradually zoom toward the mountain.
For a subtle effect, avoid enlarging the photo excessively.
A small amount of movement often looks more natural than a dramatic zoom.
How to Create a Zoom-Out Effect
A zoom-out animation uses the same technique in reverse.
Instead of starting with the full image and enlarging it, begin with a closer view and finish with a wider view.
Example
At the beginning:
The photo is enlarged, showing a person's face.
At the end:
The photo returns to its normal size, revealing the full scene.
To create this:
- Select the photo.
- Move the playhead to the starting point.
- Enlarge the photo.
- Add a keyframe for the starting state.
- Move the playhead forward.
- Reduce the photo to its desired ending size.
- Preview the animation.
The photo should gradually zoom out.
This technique is useful for revealing more of a scene over time.
How to Animate a Photo in CapCut
Keyframes can make still photos more interesting.
Instead of displaying an unmoving image for several seconds, you can create gentle movement.
For example, you could make a photo:
- Move slowly from left to right.
- Zoom toward a subject.
- Zoom out to reveal the full scene.
- Move upward.
- Rotate slightly.
To animate a photo, add it to your project and select it.
Create a keyframe at the beginning, move the playhead forward, and adjust the photo's position or size.
CapCut creates the movement between the keyframes.
Try using one simple movement at first.
Once you're comfortable, experiment with additional keyframes.
How to Move an Image Across the Screen
You can also use keyframes to move an image from one position to another.
Imagine you have an image overlay that should enter from the left side of the screen.
You can create a starting keyframe with the image positioned to the left.
Then move the playhead forward and reposition the image closer to the center.
When the video plays, the image moves toward its new position.
The same technique can be used to move an image upward, downward, or diagonally.
If the movement looks too abrupt, adjust the timing or add intermediate keyframes where appropriate.
How to Animate Text With Keyframes
Keyframes can also be useful for custom text movement when the relevant controls are available for the selected text element in your CapCut version.
For example, you might want a title to move from the bottom of the screen toward the center.
The general process is:
- Add text to your video.
- Select the text element.
- Find the available keyframe or animation controls.
- Set the starting position.
- Move the playhead forward.
- Change the text's position.
- Preview the movement.
If your version doesn't expose keyframes for the selected text element, check the built-in text animation options instead.
Don't confuse keyframe animation with CapCut's ready-made text animation presets. Keyframes are used to define your own changes over time, while presets provide predefined animation behavior.
How to Use More Than Two Keyframes
Two keyframes are enough for a basic animation.
However, you can use additional keyframes to create more complex movement.
Imagine you want a photo to:
- Start at normal size.
- Zoom in.
- Stay zoomed in briefly.
- Zoom out.
You can create several keyframes to define those stages.
For example:
Keyframe 1: Normal size.
Keyframe 2: Enlarged size.
Keyframe 3: Same enlarged size, creating a pause.
Keyframe 4: Return to normal size.
When you play the video, CapCut transitions between the states you defined.
This gives you more control than a single zoom-in or zoom-out animation.
How to Control Keyframe Animation Speed
Keyframe timing is important.
Imagine two keyframes that move an image from the left side of the screen to the right.
If the keyframes are one second apart, the movement happens quickly.
If they're four seconds apart, the movement takes longer.
You can change the speed by changing the time between the keyframes.
For Faster Movement
Move the keyframes closer together.
For Slower Movement
Increase the distance between the keyframes.
For a Pause
Use consecutive keyframes that hold the same value before the next change.
Preview the result after every major timing adjustment.
How to Make Keyframe Animations Look Smoother
A technically correct animation doesn't always look natural.
Here are several ways to improve the result.
Use Smaller Movements
A gentle zoom or small position change can look more polished than a large movement.
Allow Enough Time
If an image moves too far in too little time, the animation can feel rushed.
Increase the time between keyframes.
Keep the Subject Visible
When moving or zooming an image, make sure the important subject remains within the frame.
Avoid Unnecessary Keyframes
More keyframes do not automatically produce better animation.
Start with two and add more only when they serve a purpose.
Use Available Motion Controls
Some CapCut versions or platforms provide additional motion or easing controls.
If your version offers them for the selected animation, experiment with the available options to refine the movement.
Why Is the Keyframe Button Not Showing in CapCut?
If you can't find the keyframe icon, check the following.
The Clip Isn't Selected
Tap the video, photo, or overlay you want to animate.
The keyframe control may not be visible until a compatible element is selected.
You're in the Wrong Editing Menu
Return to the main clip-editing controls and check for the diamond-shaped keyframe icon.
The location can change between app versions.
The Selected Element Doesn't Support That Control
Not every property or element necessarily exposes the same keyframe options.
Try selecting a standard video clip or photo and checking again.
The App Interface Has Changed
CapCut regularly updates its interface.
If the instructions you're following show a different layout, look for the equivalent keyframe control in your current version.
Why Are My CapCut Keyframes Not Working?
If you added keyframes but don't see any movement, several things may be happening.
Both Keyframes Have the Same Values
If the image is the same size and in the same position at both points, there may be no visible animation.
Change a supported property at the second keyframe.
The Keyframes Are Too Close Together
The animation may happen so quickly that it's difficult to notice.
Increase the time between them.
You're Previewing the Wrong Part of the Clip
Move the playhead to a point before the first keyframe and play through the animation.
You Selected a Different Element
Make sure you're editing the same clip or overlay that contains the keyframes.
The Project Needs to Be Reopened
If the interface appears unresponsive, save your work, close the project, and reopen it.
Avoid deleting app data or uninstalling CapCut without first protecting any projects that matter to you.
Keyframes vs CapCut Animation Presets
CapCut includes different ways to animate content.
Two commonly confused approaches are keyframes and animation presets.
Keyframes
Keyframes let you define how an element changes between selected points on the timeline.
They're useful when you want custom movement or timing.
Animation Presets
Presets provide ready-made animation styles.
They're useful when you want a quick effect without creating the movement yourself.
For example, a preset might make text enter the screen using a predefined animation.
With keyframes, you can define the starting and ending positions yourself when those controls are available.
Neither method is required for every project. Choose the one that fits the edit you're creating.
Are Keyframes Useful for YouTube Shorts and Reels?
Yes. Keyframes can be particularly useful when editing vertical videos.
You can use them to:
- Zoom toward a subject.
- Animate photos in a slideshow.
- Move an overlay into position.
- Create a gradual reveal.
- Add subtle movement to otherwise static footage.
Keep important subjects and text within the visible area of the final video.
Always preview the result at the intended aspect ratio before exporting.
Frequently Asked Questions
How many keyframes do I need?
Two keyframes are enough to create a basic transition between a starting state and an ending state.
More complex animations may require additional keyframes.
Can I add keyframes to photos?
Yes. CapCut's mobile editing tools support using keyframes to create movement in visual content, including photo-based animations.
Can I zoom in with keyframes?
Yes. A zoom effect is one of the simplest ways to learn keyframe animation.
Set the starting size at one point and a larger size at another.
Can I change keyframe speed?
You can change the duration of the animation by adjusting the time between keyframes.
Additional timing controls may depend on the version and selected element.
Is keyframe animation the same as Auto Cut?
No.
Auto Cut is an automated editing workflow.
Keyframes let you manually define changes to selected elements over time.
Do I need a template to use keyframes?
No.
You can add keyframes while editing your own project without starting from a template.
Final Thoughts
Keyframe animation is a useful CapCut skill because it gives you more control over movement and timing.
You don't need to begin with complicated effects.
Start with a single photo and create a simple zoom:
- Select the photo.
- Add a starting keyframe.
- Move the playhead forward.
- Enlarge the photo.
- Create or confirm the ending keyframe.
- Preview the animation.
- Adjust the timing.
Once you understand that process, experiment with position changes, additional keyframes, and other supported properties.
The most important thing to remember is that keyframes define how an element changes over time. Start with two points, make one visible change, and build from there.
Related Articles

How to Fix CapCut Video Lagging After Export on Android
Fix CapCut video lagging after export on Android. Learn how to troubleshoot choppy playback, frame-rate mismatches, heavy effects, storage issues, and export settings.
GetApkFree Team

How to Fix CapCut Preview Not Matching Export on Android
Fix CapCut preview not matching the exported video on Android. Troubleshoot missing effects, text, transitions, timing, colors, and rendering differences.
GetApkFree Team

How to Fix Couldn't Apply AI Background in CapCut on Android
Getting "Couldn't Apply AI Background" in CapCut on Android? Check usage limits, clip selection, video quality, app updates, and practical troubleshooting steps.
GetApkFree Team

How to Fix CapCut Effects Not Applying on Android
CapCut effects not working on Android? Check clip selection, effect layers, timeline timing, conflicting adjustments, and app performance with these practical fixes.
GetApkFree Team