
This article is about
CapCut - Download
ByteDance Pte. Ltd. · Education
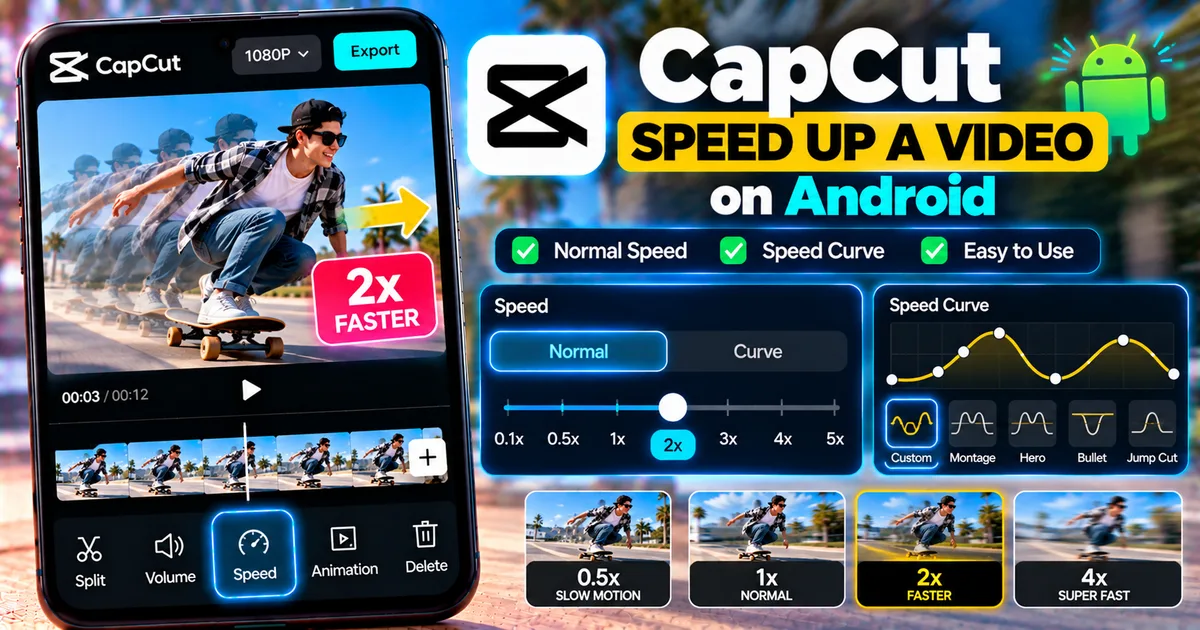
How to Speed Up a Video in CapCut on Android
GetApkFree Team
Learn how to speed up a video in CapCut on Android using Normal and Curve speed controls, adjust playback speed, and fix common problems.
- Version
- Latest
- Source
- Google Play
- Package
- external.capcut.en.softonic.com.capcut-download
How to Speed Up a Video in CapCut on Android
Want to make a video play faster on your Android phone? CapCut makes it easy to increase the playback speed of a video without needing a complicated video editor.
You can speed up an entire clip at a consistent rate or use a speed curve when you want the video to accelerate and slow down at different points.
This guide explains how to speed up a video in CapCut on Android, how to choose the right speed, how to use Curve speed, and what to do if the result does not look or sound right.
Quick Answer
To speed up a video in CapCut on Android:
- Open CapCut and create a new project.
- Add the video you want to edit.
- Tap the video clip on the timeline.
- Select Speed.
- Choose Normal.
- Move the speed control above 1×.
- Preview the video.
- Tap Export when you are satisfied.
For more advanced effects, use Speed > Curve to change the speed at different points of the video.
How to Speed Up a Video in CapCut on Android
Step 1: Open CapCut
Launch CapCut on your Android phone.
From the home screen, start a new project and select the video you want to make faster.
After importing the clip, it will appear on the editing timeline.
Step 2: Select Your Video Clip
Tap the video clip in the timeline.
This opens the editing controls for that specific clip.
Make sure you have selected the correct clip before changing its speed.
Step 3: Open the Speed Controls
Look through the editing options and tap "Speed."
CapCut provides different ways to control playback speed.
For a simple speed increase, choose "Normal."
Normal speed adjustment changes the playback speed consistently across the selected clip.
Step 4: Increase the Video Speed
Move the speed control to a value above 1×.
For example:
- 1× = normal playback speed
- 1.25× = slightly faster
- 1.5× = noticeably faster
- 2× = twice the normal playback speed
- Higher values = increasingly faster playback
The best setting depends on the type of video you are editing.
For a talking video, a moderate increase can make the video shorter without making the speech excessively difficult to follow.
For repetitive footage, screen recordings, travel footage, or process videos, a much higher speed may work better.
Step 5: Preview the Result
Play the edited video before exporting it.
Pay attention to:
- How quickly the scenes change
- Whether speech is still understandable
- Whether the movement looks natural
- Whether the final video feels too rushed
- Whether the audio still works the way you want
If the video feels too fast, reduce the speed slightly and preview it again.
How to Make Only Part of a Video Faster
You do not always have to speed up the entire video.
If you only want to make one section faster, first split the video around the section you want to change.
For example:
- Select the video clip.
- Move the playhead to where the faster section should begin.
- Split the clip.
- Move to the end of the section.
- Split the clip again.
- Select the middle section.
- Open Speed.
- Increase its speed.
Now the surrounding sections can remain at normal speed while the selected portion plays faster.
This is useful for tutorials, cooking videos, travel footage, gaming clips, and other videos where some sections contain repetitive actions.
How to Speed Up a Video With CapCut Curve Speed
CapCut also provides Curve speed controls for more dynamic editing.
Instead of applying one speed to the entire clip, a speed curve allows the playback speed to change at different points.
A video might:
- Start at normal speed
- Accelerate quickly
- Stay fast for a moment
- Slow down
- Return to normal speed
This can create a more dynamic transition than simply setting the entire clip to 2× speed.
To try it:
- Select the video clip.
- Tap Speed.
- Choose Curve.
- Select an available preset or customize the speed curve.
- Preview the result.
- Adjust the curve if necessary.
- Export the finished video.
Curve speed is particularly useful for short-form videos and creative edits where changes in pacing are part of the visual effect.
What Speed Should You Use?
There is no single speed that works for every video.
Here is a simple starting point:
1.25× Speed
Use this when you want the video to feel slightly faster while keeping most of the original pacing.
It can work well for:
- Talking videos
- Tutorials
- Presentations
- Explanations
1.5× Speed
This gives a more obvious increase in pace.
It can be useful for:
- Tutorials
- Screen recordings
- Long explanations
- Repetitive actions
2× Speed
This makes the video play twice as fast.
It can work well for:
- Walking footage
- Setup processes
- Cooking preparation
- Drawing
- Crafting
- Long screen recordings
Higher Speeds
Very high speeds can be useful when you want to compress a long process into a short sequence.
However, extremely fast playback can make details difficult to follow, so preview the result before exporting.
How to Speed Up a Video Without Making It Look Bad
Increasing speed changes the timing of the footage, but it does not automatically make every video look better.
Try these tips:
Keep Important Moments at Normal Speed
If something important happens in the video, consider keeping that section at normal speed.
You can speed up less important sections and leave important moments easier to watch.
Use Splits
Splitting the timeline gives you more control.
Instead of applying the same speed to everything, you can create different sections with different playback speeds.
Preview Before Exporting
Always watch the complete edited video before saving it.
A speed setting can look good on one short section but feel too fast when applied to a longer sequence.
Be Careful With Speech
Increasing the speed of a talking video can make speech difficult to follow.
If the main purpose of the video is communication, start with a smaller speed increase and listen to the result.
How to Speed Up a Video for a Time-Lapse Effect
You can also use speed adjustments to create a time-lapse-style result from existing footage.
For example, you could speed up:
- A drawing process
- Cooking preparation
- A workout session
- A room setup
- A travel sequence
- A long screen recording
Select the clip, open Speed, choose Normal, and increase the playback speed until the movement has the pacing you want.
For longer footage, experiment with the speed rather than choosing an extremely high value immediately.
Why Does My Speeded-Up Video Look Choppy?
A faster video can sometimes appear less smooth, especially when the original footage has limited frames, lots of movement, or other motion-related limitations.
Try these steps:
- Reduce the speed slightly.
- Preview the footage at full size.
- Check whether the original video was already low quality.
- Avoid excessive speed changes on clips with complex movement.
- Try a different section of the source footage if necessary.
The quality of the original recording has a major effect on the final result.
Why Does the Audio Sound Too Fast?
When you increase video speed, the audio timing can change as well.
If dialogue becomes difficult to understand, consider:
- Using a smaller speed increase
- Separating the audio from the video when appropriate
- Replacing the original audio with music or another audio track
- Keeping dialogue sections at normal speed
- Using different speed settings for different parts of the video
For videos where spoken information is important, aggressive speed increases are usually less practical.
How to Make a Fast Video More Interesting
Speed changes can be combined with other CapCut editing tools.
For example, you can combine faster sections with:
- Text
- Overlays
- Keyframes
- Transitions
- Music
- Sound effects
- Motion tracking
You can also use a speed curve to create changes in pacing rather than keeping the entire video at one constant speed.
Speed Up vs Velocity Editing in CapCut
Speeding up a video and creating a velocity edit are related, but they are not exactly the same.
A normal speed adjustment generally changes playback speed consistently across the selected clip.
A velocity edit uses changing speed values throughout the clip.
For example:
Normal speed: 1× → 2× → 2×
Velocity: 1× → 2× → 0.5× → 3× → 1×
If you simply want your entire video to play faster, Normal speed is easier.
If you want dramatic changes in pacing, Curve or velocity-style editing gives you more control.
How to Export the Faster Video
When your edit is finished:
- Preview the entire video.
- Make sure the speed is correct.
- Tap Export.
- Choose the available resolution and frame-rate settings that match your project.
- Start the export.
- Check the finished video in your device's gallery.
If you plan to upload the video to a social platform, consider the platform's preferred format and resolution before exporting.
Common Problems When Speeding Up Videos in CapCut
Speed Option Is Missing
Make sure you have selected a video clip on the timeline.
Editing controls can change depending on what is selected.
Video Is Too Fast
Lower the speed value and preview the result again.
You can also split the video and apply a higher speed only to repetitive sections.
Video Looks Choppy
Try reducing the speed increase and check the original footage quality.
Audio Sounds Strange
Use a lower speed setting or consider replacing or separately editing the audio.
Curve Speed Looks Too Dramatic
Start with smaller changes between speed points.
Large changes can create an abrupt effect that may not match your footage.
Final Thoughts
Speeding up a video in CapCut on Android is a simple way to shorten footage, improve pacing, or create a more energetic edit.
For a consistent speed increase, use the Normal speed control. If you want different sections to accelerate and slow down, experiment with Curve speed.
The most important step is to preview the complete video before exporting. A speed setting that looks good on one section may feel too fast across an entire project.
Start with a moderate increase such as 1.25× or 1.5×, then adjust it based on the type of footage and the result you want.
Related Articles

How to Fix CapCut Video Lagging After Export on Android
Fix CapCut video lagging after export on Android. Learn how to troubleshoot choppy playback, frame-rate mismatches, heavy effects, storage issues, and export settings.
GetApkFree Team

How to Fix CapCut Preview Not Matching Export on Android
Fix CapCut preview not matching the exported video on Android. Troubleshoot missing effects, text, transitions, timing, colors, and rendering differences.
GetApkFree Team

How to Fix Couldn't Apply AI Background in CapCut on Android
Getting "Couldn't Apply AI Background" in CapCut on Android? Check usage limits, clip selection, video quality, app updates, and practical troubleshooting steps.
GetApkFree Team

How to Fix CapCut Effects Not Applying on Android
CapCut effects not working on Android? Check clip selection, effect layers, timeline timing, conflicting adjustments, and app performance with these practical fixes.
GetApkFree Team