
This article is about
CapCut - Download
ByteDance Pte. Ltd. · Education
How to Stabilize Shaky Video in CapCut on Android
GetApkFree Team
Learn how to stabilize shaky videos in CapCut on Android, choose the right stabilization level, reduce camera shake, and fix common problems.
- Version
- Latest
- Source
- Google Play
- Package
- external.capcut.en.softonic.com.capcut-download
How to Stabilize Shaky Video in CapCut on Android
Handheld video can sometimes look shaky, especially when you are walking, recording without a tripod, or filming in a moving environment.
You don't always need to record the video again. CapCut includes a Stabilize tool that can analyze shaky footage and smooth out unwanted camera movement.
On Android, you can import a video, select the clip, open the stabilization controls, choose a stabilization level, preview the result, and export the edited video.
This guide explains how to stabilize shaky video in CapCut on Android, which stabilization setting to choose, why stabilization can crop footage, and how to troubleshoot common problems.
What Is Video Stabilization in CapCut?
Video stabilization is designed to reduce unwanted movement in recorded footage.
For example, imagine you record a walking video while holding your phone. Small hand movements can cause the entire frame to shake.
Stabilization attempts to compensate for that movement so the final video appears smoother.
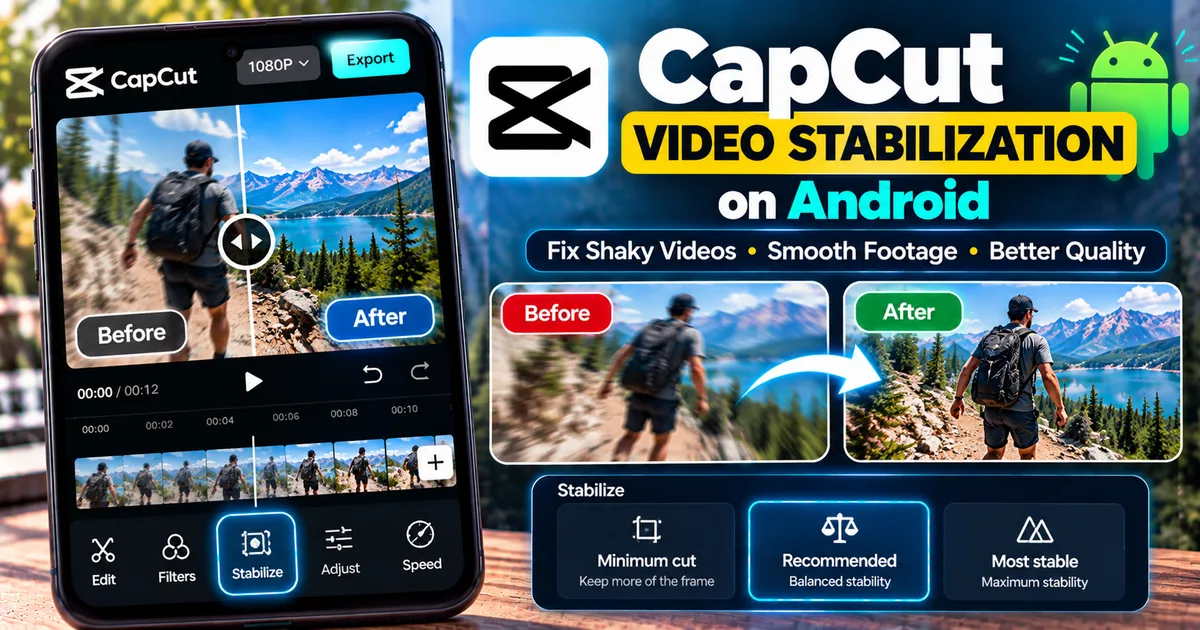
CapCut provides stabilization controls on its mobile editor, with options including:
- Recommended
- Minimum cut
- Most stable
The exact interface can change between CapCut versions.
Can CapCut Stabilize Shaky Videos on Android?
Yes.
CapCut's current mobile documentation provides a stabilization workflow for Android and iPhone.
The basic process is:
- Open CapCut.
- Create a new project.
- Import your shaky video.
- Select the video clip.
- Open Edit.
- Select Stabilize.
- Choose a stabilization level.
- Preview the result.
- Confirm the adjustment.
- Export the video.
CapCut documents the same general mobile workflow for stabilizing shaky footage. :contentReference[oaicite:1]{index=1}
How to Stabilize Shaky Video in CapCut on Android
Step 1: Open CapCut
Launch CapCut on your Android phone.
Create a new project.
Step 2: Import Your Video
Select the video that contains unwanted camera shake.
Add it to the editing timeline.
If you have a long recording, you don't necessarily need to stabilize the entire file.
It can be more efficient to identify the sections that actually need stabilization.
Step 3: Select the Video Clip
Tap the video clip in the timeline.
This opens the editing controls for that clip.
Make sure you have selected the correct clip before continuing.
Step 4: Open the Stabilize Tool
Look through the editing options and select:
Edit → Stabilize
CapCut's current mobile guide identifies Stabilize inside the editing controls after selecting the clip. :contentReference[oaicite:2]{index=2}
Step 5: Choose a Stabilization Level
CapCut currently documents three stabilization choices in its mobile workflow:
- Minimum cut
- Recommended
- Most stable
The wording and presentation can change with app updates, but these options represent different approaches to balancing stabilization and cropping. :contentReference[oaicite:3]{index=3}
Step 6: Start With Recommended
If you aren't sure which setting to use, start with the Recommended option.
Preview the result before choosing a stronger setting.
If the footage still looks noticeably shaky, you can experiment with a stronger stabilization level.
Step 7: Preview the Result
Watch the stabilized footage carefully.
Look for:
- Remaining camera shake
- Unnatural movement
- Excessive cropping
- Missing edges
- Distortion
- Important objects moving too close to the frame edge
Don't judge the result from a single paused frame.
Watch the video at normal speed.
Step 8: Confirm the Stabilization
If the result looks good, confirm the adjustment using the control shown in your current CapCut version.
Step 9: Export the Video
Tap Export.
Choose the available export settings and save the stabilized video to your device.
The available resolution and other export options can vary depending on your device, platform, project, and CapCut version.
Which CapCut Stabilization Setting Should You Use?
The three commonly documented levels have different purposes.
Minimum Cut
This option is useful when you want to preserve more of the original frame.
Because stabilization can require adjusting the visible frame, a lower cropping approach can help retain more of the original composition.
Use it when the footage is only slightly shaky.
Recommended
This is a good starting point for ordinary handheld footage.
Try Recommended first and inspect the result.
If the video looks smooth enough, there may be no reason to use a stronger setting.
Most Stable
This option is intended when reducing visible shake is more important than preserving as much of the original framing.
It can be useful for footage with stronger movement.
However, stronger stabilization can result in more noticeable changes to the visible frame.
Why Does Stabilization Crop My Video?
One common effect of video stabilization is cropping.
When a camera moves, the software needs to compensate for that movement while keeping the output frame filled.
This can require moving or scaling the visible area of the video.
As a result, parts of the original edges may no longer be visible.
CapCut's current stabilization documentation specifically provides different stabilization levels that balance stability and cropping. :contentReference[oaicite:4]{index=4}
How to Reduce Cropping When Stabilizing Video
If stabilization removes too much of the frame, try a less aggressive setting.
For example:
- Open Stabilize.
- Try Minimum cut.
- Preview the result.
- Compare it with Recommended.
- Choose the setting that gives you the best balance.
You don't necessarily need the strongest stabilization.
For a mildly shaky video, a lighter setting may produce a more natural result.
How to Stabilize a Walking Video in CapCut
Walking footage is one of the most common situations where stabilization can help.
Suppose you are recording a travel vlog while walking through a city.
Your footage may contain small movements from:
- Your hands
- Your walking motion
- Turning the phone
- Changing direction
- Holding the phone at different angles
Import the clip into CapCut and apply Stabilize.
Start with Recommended and preview the footage.
If the result still contains too much shake, try a stronger level.
Don't automatically apply the strongest setting to every clip.
How to Stabilize a Handheld Video
For ordinary handheld footage:
- Import the video.
- Select the clip.
- Open Edit.
- Tap Stabilize.
- Start with Recommended.
- Preview the result.
- Compare with Minimum cut or Most stable if necessary.
- Confirm the preferred setting.
- Export.
This workflow works particularly well for short clips where the camera shake is noticeable but not extreme.
How to Stabilize Travel Videos
Travel videos often contain handheld footage captured while walking, sightseeing, or moving through crowded areas.
Stabilization can be useful for clips showing:
- Streets
- Buildings
- Landscapes
- Walking tours
- Tourist attractions
- Boats
- Cars
- Outdoor activities
However, not every movement is unwanted.
For example, deliberate camera movement can be part of the shot.
If stabilization makes intentional movement look unnatural, compare the original and stabilized versions before keeping the effect.
How to Stabilize a Video Without Making It Look Artificial
Too much stabilization can sometimes make natural camera movement look unusual.
To keep your footage natural:
Start With a Moderate Setting
Try Recommended before moving to the strongest setting.
Check the Edges
Make sure important objects aren't being pushed out of the frame.
Watch the Entire Clip
A setting that looks good during one section may behave differently later in the video.
Don't Stabilize Every Clip Automatically
Some footage may already be smooth enough.
Apply stabilization where it actually improves the video.
Why Is My Stabilized Video Still Shaky?
Stabilization doesn't guarantee that every type of movement will disappear.
If the footage is extremely unstable, try comparing the available stabilization levels.
Also check whether the movement is actually caused by something other than camera shake.
For example, a moving subject can create motion that stabilization shouldn't completely remove.
If the original recording contains severe motion blur, stabilization may also have limited ability to make the footage look completely smooth.
Why Does My Stabilized Video Look Warped?
Unusual distortion can sometimes occur when stabilization has to compensate for complex movement.
Try:
- A lower stabilization level
- A shorter section of the clip
- Removing unnecessary footage
- Comparing the original and stabilized versions
If the footage contains rapid camera movement, extreme rotation, or complicated motion, the result may not look as natural as a carefully recorded stable shot.
Why Is CapCut Stabilization Taking So Long?
Stabilization requires processing the video.
Long clips can take more time to process than short clips.
CapCut's current help documentation also notes that stabilization during export can take longer when stabilization is applied to multiple clips or long clips. :contentReference[oaicite:5]{index=5}
If stabilization appears unusually slow:
Shorten the Clip
Split a long video and stabilize only the section that needs it.
Stabilize Fewer Clips
Don't apply stabilization to every clip unless necessary.
Simplify the Timeline
A complicated project with many effects and stabilized clips can require more processing.
Close Other Apps
Freeing system resources may help your phone handle the processing more efficiently.
Try Exporting Again
If the process becomes stuck, save the project and retry after reducing the amount of stabilization being applied.
What Does "Stabilizing" Mean During Export?
You may sometimes see Stabilizing while CapCut is exporting.
This means CapCut is processing the stabilization effect.
It doesn't necessarily indicate an error.
CapCut's current help documentation says export time can vary based on factors such as project length, settings, and how many clips have stabilization enabled. :contentReference[oaicite:6]{index=6}
If it stays on the same stage for an unusually long time, check which clips have stabilization enabled and consider splitting longer clips.
Can You Stabilize Only Part of a Video?
Yes.
You don't have to apply stabilization to the entire project.
If only one section is shaky, you can split the video and apply stabilization to the part that needs it.
A practical workflow is:
- Import the complete video.
- Find the shaky section.
- Split the clip around that section.
- Select the shaky section.
- Open Stabilize.
- Choose the desired level.
- Preview it.
- Leave the stable sections unchanged.
This can also reduce unnecessary processing.
Should You Stabilize Before Adding Effects?
For a simple editing workflow, it can be useful to stabilize the footage before adding many other effects.
That gives you an opportunity to evaluate the corrected footage first.
For example:
- Import footage.
- Trim unwanted sections.
- Stabilize the shaky portions.
- Review the result.
- Add captions.
- Add music.
- Add effects and transitions.
- Export.
The exact editing order isn't mandatory, but keeping the project organized can make troubleshooting easier.
CapCut Stabilization vs Recording With a Tripod
Software stabilization is useful, but it doesn't replace stable recording equipment.
If you can record with:
- A tripod
- A phone gimbal
- A stable surface
- Both hands
- Better camera support
you may capture cleaner footage in the first place.
Stabilization is most useful for improving footage you have already recorded.
Tips for Recording Less Shaky Video
You can reduce the amount of correction required by improving your recording technique.
Hold the Phone With Both Hands
This can provide more stability than holding it with one hand.
Keep Your Elbows Close
This can reduce unnecessary arm movement.
Walk Slowly
If you're recording while walking, avoid sudden movements.
Use a Stable Support
A tripod or other stable support can dramatically reduce camera movement.
Avoid Rapid Panning
Move the phone slowly when changing the direction of the shot.
Keep the Lens Clean
A dirty lens can reduce image quality even when the footage is stable.
Can CapCut Stabilize Low-Light Footage?
CapCut can attempt to stabilize footage captured in difficult lighting conditions, but stabilization doesn't automatically fix every problem caused by low light.
Low-light footage can contain:
- Noise
- Motion blur
- Soft details
- Exposure changes
Stabilization may reduce camera movement, but it cannot turn heavily blurred footage into perfectly sharp video.
For better results, record with sufficient lighting whenever possible.
Can You Stabilize Drone Footage in CapCut?
Yes, CapCut's current material describes stabilization as useful for footage such as drone videos.
However, drone footage can contain complex movement caused by:
- Wind
- Direction changes
- Camera rotation
- Rapid movement
Test the stabilization on a short section first and check whether the result looks natural. :contentReference[oaicite:7]{index=7}
Can You Stabilize Slow-Motion Video?
You can try stabilization on slow-motion footage if the clip contains unwanted camera shake.
However, slow-motion footage may already have a different motion appearance because of its capture frame rate and playback speed.
Preview the result carefully after stabilization.
Frequently Asked Questions
Does CapCut have a video stabilizer on Android?
Yes. CapCut's current mobile documentation describes a Stabilize tool for Android and iPhone. :contentReference[oaicite:8]{index=8}
Where is Stabilize in CapCut?
Select the video clip and look under the editing controls for Edit → Stabilize. The exact interface can change between versions. :contentReference[oaicite:9]{index=9}
Which stabilization setting should I use?
Start with Recommended for ordinary shaky footage. Compare it with Minimum cut or Most stable if you need a different balance between smoothing and cropping.
Why does CapCut crop my video when stabilizing?
Stabilization may need to adjust the visible frame to compensate for camera movement. Different stabilization levels can provide different balances between stability and cropping. :contentReference[oaicite:10]{index=10}
Can CapCut fix very shaky video?
It can reduce unwanted camera movement, but extremely unstable footage may still have limitations. The quality of the original recording affects the final result.
Can I stabilize only one part of a video?
Yes. Split the video and apply stabilization to the section that needs it.
Why is CapCut taking so long to stabilize?
Long clips, multiple stabilized clips, and complex projects can increase processing time. CapCut recommends checking which clips have stabilization enabled and using shorter clips where appropriate. :contentReference[oaicite:11]{index=11}
Does stabilization remove all camera shake?
No. Stabilization is designed to reduce unwanted movement, but the result depends on the original footage and the type and severity of the movement.
Final Thoughts
CapCut's Stabilize tool is useful when you have handheld or otherwise shaky footage that needs smoothing before you publish it.
The basic Android workflow is:
- Open CapCut.
- Create a new project.
- Import the shaky video.
- Select the clip.
- Open Edit.
- Tap Stabilize.
- Choose Minimum cut, Recommended, or Most stable.
- Preview the result.
- Confirm the adjustment.
- Export the finished video.
For most clips, start with a moderate setting and compare the result before choosing stronger stabilization.
Also remember that stabilization can change the framing of a video, so check the edges and make sure important subjects remain visible.
For future recordings, stable camera technique, a tripod, or other physical support can reduce the amount of stabilization needed in post-production.
Related Articles

How to Fix CapCut Video Lagging After Export on Android
Fix CapCut video lagging after export on Android. Learn how to troubleshoot choppy playback, frame-rate mismatches, heavy effects, storage issues, and export settings.
GetApkFree Team

How to Fix CapCut Preview Not Matching Export on Android
Fix CapCut preview not matching the exported video on Android. Troubleshoot missing effects, text, transitions, timing, colors, and rendering differences.
GetApkFree Team

How to Fix Couldn't Apply AI Background in CapCut on Android
Getting "Couldn't Apply AI Background" in CapCut on Android? Check usage limits, clip selection, video quality, app updates, and practical troubleshooting steps.
GetApkFree Team

How to Fix CapCut Effects Not Applying on Android
CapCut effects not working on Android? Check clip selection, effect layers, timeline timing, conflicting adjustments, and app performance with these practical fixes.
GetApkFree Team