
This article is about
CapCut Premium
capcutdownload.com.pk · Tools
How to Use Masks in CapCut on Android
GetApkFree Team
Learn how to use masks in CapCut on Android to reveal, hide, blur, and combine parts of videos with shape, feather, position, and animation controls.
- Source
- Developer
- Package
- CapCut Premium
How to Use Masks in CapCut on Android
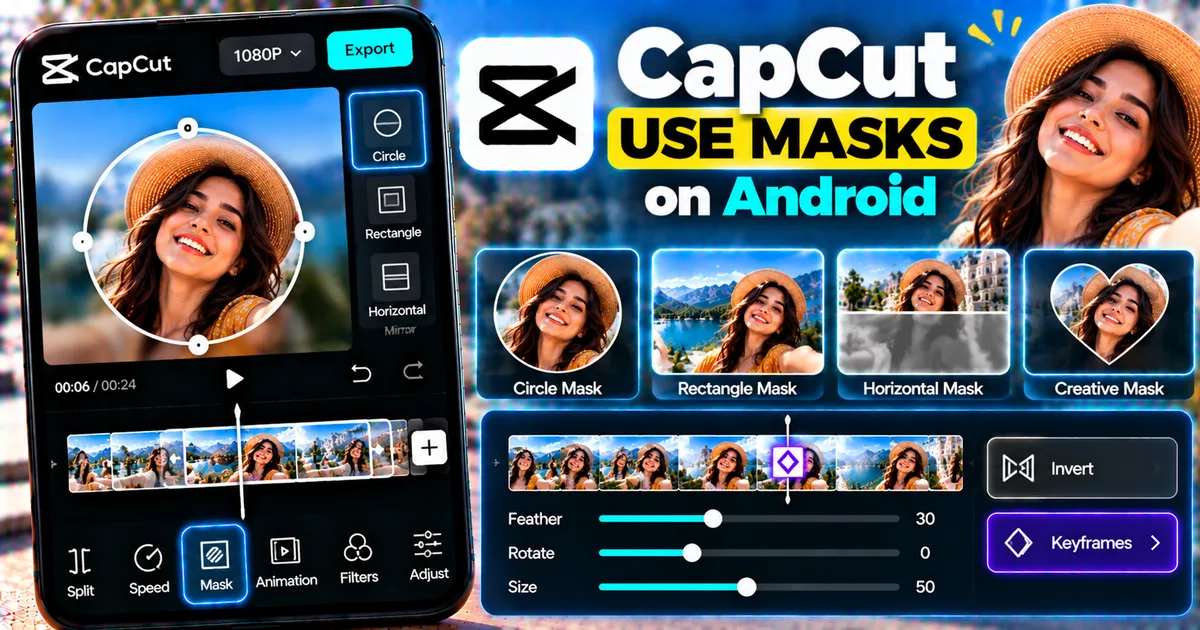
CapCut's Mask tool lets you control which part of a video layer is visible. Instead of applying an effect to the entire clip, you can use a mask to reveal only a selected area, hide part of a layer, create shapes, combine clips, or build more advanced video effects.
Masking can be useful for transitions, split-screen videos, picture-in-picture effects, creative reveals, blur effects, and other layered edits.
This guide explains how to use masks in CapCut on Android, how the different mask controls work, and how to create practical masking effects.
Quick Answer
To use a mask in CapCut on Android, create a project with your video, add or select the layer you want to mask, open the masking controls when available, choose a mask shape, and adjust its size and position. You can also use controls such as Feather, Rotate, and Invert when available.
For moving subjects or objects, you may need to animate the mask with keyframes or use tracking features when supported by your version of CapCut.
What Is a Mask in CapCut?
A mask controls which portion of a video or image layer is visible.
Think of a mask as a window.
The layer may contain an entire video, but the mask determines which part of that layer viewers can see.
For example, a circular mask can reveal a round portion of a video while hiding the rest.
A rectangular mask can reveal one section of a clip.
A feathered mask can soften the edge between the visible and hidden areas.
Masking is particularly useful when you want precise control over layers instead of applying an effect to the entire frame.
What Can You Do With Masks in CapCut?
Masks can be used for many different editing tasks.
For example, you can use them to:
- Reveal part of a video
- Hide part of a video
- Create split-screen layouts
- Create circular video windows
- Blend two clips together
- Create creative transitions
- Apply blur to a specific area
- Highlight a subject
- Create picture-in-picture effects
- Build reveal animations
- Create visual illusions
- Control where an overlay appears
CapCut's current masking tools include controls for shape, feathering, size, position, rotation, and inversion, although the exact interface can vary between versions and platforms.
How to Use a Mask in CapCut on Android
The exact location of the Mask control can change between CapCut versions, so the names or positions of some buttons may look different on your phone.
The general workflow is:
Step 1: Open CapCut
Launch CapCut on your Android phone.
Start a new project or open an existing project containing the video you want to edit.
Step 2: Add Your Video
Import the video into the project.
The video will appear on the editing timeline.
If you plan to combine two videos with masking, you will eventually need multiple layers.
Step 3: Select the Layer
Tap the video or overlay layer that you want to mask.
This is important because the mask is applied to the selected layer.
If you have several clips or overlays, make sure you have selected the correct one.
Step 4: Find the Mask Tool
Look through the editing controls for the Mask option.
Depending on your CapCut version, the option may appear under the selected clip's video or basic editing controls.
CapCut's current masking documentation describes Mask as an editing control for selectively showing parts of a layer.
Step 5: Choose a Mask Shape
Select the mask shape that fits your project.
Depending on the current version, available shapes may include options such as:
- Circle
- Rectangle
- Horizontal
- Other shape-based masks
The available mask shapes can change over time.
Step 6: Adjust the Mask
After applying a mask, adjust its position and size so that the visible portion of the video appears where you want it.
You can use the available controls to change:
- Size
- Position
- Rotation
- Feather
- Inversion
Preview the video after making your changes.
How to Use a Circle Mask in CapCut
A circular mask is useful when you want to display video inside a round area.
For example, you can create a reaction-style video where your face appears inside a circular window over another video.
A basic workflow is:
- Add your main video.
- Add another video as an overlay.
- Select the overlay.
- Open Mask.
- Choose a circular mask.
- Resize the circle.
- Position it where you want.
- Adjust Feather if needed.
- Preview the result.
This can create a simple picture-in-picture effect.
How to Use a Rectangle Mask
A rectangular mask can be useful for split-screen layouts and controlled reveals.
For example, you could show one video on the left side of the screen and another on the right.
A simple workflow is:
Main video + Overlay video + Rectangle mask
Adjust the mask's position and size until the desired portion of the overlay is visible.
How to Feather a Mask
Feathering softens the edge of a mask.
Without feathering, the boundary between the visible and hidden areas can appear sharp.
With feathering, the edge gradually blends into the surrounding area.
To adjust Feather:
- Select the masked layer.
- Open the Mask controls.
- Find Feather.
- Increase or decrease the value.
- Preview the edge.
A small amount of feathering can help create a smoother blend.
However, excessive feathering can make the masked area look blurry.
How to Invert a Mask in CapCut
Inverting a mask reverses which side of the mask is visible.
For example, if the inside of a circular mask is visible, using Invert can make the outside area visible instead.
This is useful when you want to apply an effect around a selected area rather than inside it.
For example, you might use an inverted mask when creating a blur effect around a subject.
The exact name or position of the control can vary depending on your CapCut version.
How to Move a Mask
You can reposition the mask to control which part of the layer is visible.
Select the masked layer and adjust the mask's position.
This is useful when the subject or area you want to reveal is not centered.
For example, if a person's face is toward the right side of the frame, move the mask toward the face instead of leaving it in the center.
How to Rotate a Mask
Some mask shapes can be rotated.
Rotation is particularly useful for diagonal reveals or when the direction of the mask needs to match the footage.
Select the mask and adjust its rotation control when available.
Preview the entire clip after rotating it to make sure the mask remains aligned with the intended area.
How to Create a Split-Screen Effect With Masks
Masks can be used to show two videos at the same time.
For example:
Video A | Video B
One video occupies the left side while another occupies the right side.
A basic workflow is:
- Add Video A to the main timeline.
- Add Video B as an overlay.
- Select Video B.
- Open Mask.
- Choose a rectangular mask.
- Adjust its size.
- Move the mask to reveal the desired portion.
- Align the two videos.
- Preview the result.
You can use this technique for comparisons, reactions, before-and-after videos, interviews, and creative social-media edits.
How to Create a Picture-in-Picture Effect With a Mask
Picture-in-picture places one video inside another.
A circular mask can make the overlay appear inside a round window.
For example:
Main video ↓ Circular video overlay
To create it:
- Add the main video.
- Add another video as an overlay.
- Select the overlay.
- Apply a circular mask.
- Resize it.
- Position it over the main video.
- Adjust Feather if desired.
- Preview the result.
This is useful for reaction videos and commentary content.
How to Blend Two Videos With a Mask
Masking can also help combine two clips visually.
Place one video above another.
Then apply a mask to the upper layer.
Adjust the mask so that only the desired section of the upper video is visible.
Use Feather to soften the boundary.
The result can look like two clips are blending together rather than simply switching from one to another.
How to Create a Mask Reveal Effect
A mask can be animated so that an image or video gradually becomes visible.
For example, you can start with a small visible area and expand it over time.
A general workflow is:
- Add your video or image.
- Apply a mask.
- Position and size the mask at the beginning.
- Add a keyframe when supported.
- Move forward in the timeline.
- Change the mask's size or position.
- Add another keyframe.
- Preview the animation.
CapCut uses keyframes for many types of animated adjustments, and the exact controls available for mask animation can vary by version.
How to Make a Mask Follow a Moving Subject
A static mask works well when the subject stays in approximately the same location.
But if the subject moves, the mask may need to move with it.
Depending on the current CapCut version and workflow, you may be able to use tracking or keyframes.
Using Keyframes
Place the mask over the subject.
Add a keyframe at the beginning.
Move forward in the timeline.
Reposition the mask to follow the subject.
Continue adding adjustments as the subject moves.
CapCut can interpolate between keyframes, creating a smoother movement.
For simple movement, this can be enough.
For more complicated movement, tracking features may be available depending on the version and platform.
Mask vs Background Removal
Masking and background removal are not the same thing.
Masking
Masking lets you manually control which area of a layer is visible.
It is useful when you want a specific shape or controlled region.
Background Removal
Background removal attempts to separate a subject from its background.
It is useful when you want to isolate a person or object.
For example:
Use masking when you want a circular video window.
Use background removal when you want to remove the background behind a person.
GetAPKFree has a dedicated guide for background removal in CapCut:
https://getapkfree.com/blog/how-to-remove-video-background-capcut-android
Mask vs Overlay
An overlay adds another video or image layer.
A mask controls which part of that layer is visible.
They often work together.
For example:
Main video + Overlay video + Mask applied to overlay
This combination can create split screens, circular videos, reveals, and other effects.
Learn more about overlays here:
https://getapkfree.com/blog/how-to-add-overlays-capcut-android
Mask vs Transition
A transition controls how one clip changes into another.
A mask controls the visible portion of a layer.
However, masking can also be used to create custom transitions.
For example, you can animate a mask across the screen so that one video is gradually revealed while another is hidden.
This can create a more customized result than using a standard transition preset.
For standard CapCut transitions, see:
https://getapkfree.com/blog/how-to-add-transitions-capcut-android
How to Use Masks for Blur Effects
Masking can limit a blur effect to a particular region.
For example, you may want to blur:
- A face
- A license plate
- A screen
- A document
- A private area
- A background detail
A common workflow is to apply a blur effect and then use a mask to restrict where the blur is visible.
If the subject moves, the mask may need to be animated or tracked.
For privacy-related edits, always preview the complete video carefully to make sure the area remains covered throughout the entire clip.
How to Use Masks for Creative Transitions
Masking can create custom scene transitions.
For example, you could have one video slide into view through a rectangular mask while the original clip remains underneath.
Another possibility is using a circular mask that expands until the second video fills the frame.
These techniques can be combined with keyframes, transitions, and sound effects.
How to Use Masks With Text
Masks can also be combined with text layers.
For example, you can reveal text through a shape or use layered footage to create a text-reveal effect.
More advanced text compositions can combine:
- Text
- Video
- Masks
- Overlays
- Keyframes
For ordinary text editing, see:
https://getapkfree.com/blog/how-to-add-text-capcut-android
For text behind a person, see:
https://getapkfree.com/blog/how-to-put-text-behind-person-capcut-android
How to Create a Moving Mask
A moving mask can follow an object or reveal footage across the frame.
The general workflow is:
- Select the layer.
- Apply a mask.
- Set the mask's starting position.
- Add a keyframe if supported.
- Move the timeline forward.
- Change the mask position.
- Add another keyframe.
- Continue until the movement is complete.
- Preview the entire animation.
The more complicated the movement, the more carefully you should check the mask between keyframes.
Common Masking Problems in CapCut
The Mask Is Not Showing
Make sure the correct video or overlay layer is selected.
Then check that a mask has actually been applied.
The Wrong Part of the Video Is Visible
Adjust the mask's position and size.
You may also need to use Invert if the opposite area should be visible.
The Mask Edge Looks Too Sharp
Increase Feather slightly.
Do not increase it excessively because the edge can become too soft.
The Mask Moves Away From the Subject
If the subject is moving, a static mask will not automatically follow it.
Use keyframes or a supported tracking option when available.
The Mask Looks Blurry
Check the Feather value.
Excessive feathering can soften the visible boundary.
The Mask Is Covering Too Much
Reduce its size or adjust its position.
The Mask Is Rotated Incorrectly
Open the mask controls and adjust the rotation.
The Mask Is Not Available
Make sure you have selected a compatible video or image layer and check the available editing controls.
CapCut's interface changes over time, so the location or availability of specific tools can differ between versions.
Tips for Better Masking
Start With Simple Shapes
If you are new to masking, begin with circles and rectangles.
Use Feather Carefully
A small amount of feathering can make edges look more natural.
Match the Mask to the Subject
If the subject is moving, consider whether keyframes or tracking are necessary.
Preview the Entire Clip
A mask can look correct at the beginning but drift away later.
Watch the entire section before exporting.
Avoid Unnecessary Complexity
You can create impressive effects with a simple mask, overlay, and a few keyframes.
You do not always need many effects.
Frequently Asked Questions
What is masking in CapCut?
Masking controls which portion of a video or image layer is visible. It can be used to reveal, hide, blend, blur, or isolate specific areas.
How do I use the Mask tool in CapCut?
Select the layer you want to edit, open the available Mask controls, choose a shape, and adjust its size, position, feathering, rotation, or inversion as needed.
Can I use masks on Android?
CapCut supports masking workflows, but the exact controls and interface can vary between versions and platforms.
What is Feather in CapCut Mask?
Feather softens the boundary of the mask so the transition between visible and hidden areas is less sharp.
What does Invert Mask do?
Invert reverses the visible and hidden areas of the mask.
Can a CapCut mask follow a moving object?
A mask can be animated using keyframes, and some CapCut workflows provide tracking features. Availability depends on the current version and platform.
Can I use a mask to blur a face?
Yes. A blur effect can be combined with a mask to restrict the blur to a particular area. For moving faces, the mask may need to be animated or tracked.
Can masks create transitions?
Yes. An animated mask can reveal one clip while hiding another, creating a custom transition effect.
Is masking the same as background removal?
No. Masking manually controls visible areas of a layer, while background removal is designed to isolate a subject from its background.
Final Thoughts
Masks are one of CapCut's more flexible editing tools because they let you control exactly which part of a layer viewers can see.
For beginners, start with simple circle and rectangle masks. Once you understand size, position, Feather, and Invert, you can move on to layered edits, split screens, picture-in-picture effects, blur effects, custom transitions, and animated reveals.
The key is to preview the complete clip. A mask that looks perfect on the first frame can move away from the intended subject later in the video, so check the entire edit before exporting.
Related Articles

How to Fix CapCut Video Lagging After Export on Android
Fix CapCut video lagging after export on Android. Learn how to troubleshoot choppy playback, frame-rate mismatches, heavy effects, storage issues, and export settings.
GetApkFree Team

How to Fix CapCut Preview Not Matching Export on Android
Fix CapCut preview not matching the exported video on Android. Troubleshoot missing effects, text, transitions, timing, colors, and rendering differences.
GetApkFree Team

How to Fix Couldn't Apply AI Background in CapCut on Android
Getting "Couldn't Apply AI Background" in CapCut on Android? Check usage limits, clip selection, video quality, app updates, and practical troubleshooting steps.
GetApkFree Team

How to Fix CapCut Effects Not Applying on Android
CapCut effects not working on Android? Check clip selection, effect layers, timeline timing, conflicting adjustments, and app performance with these practical fixes.
GetApkFree Team