
This article is about
CapCut Premium
capcutdownload.com.pk · Tools
How to Add Keyframes in CapCut on Android
GetApkFree Team
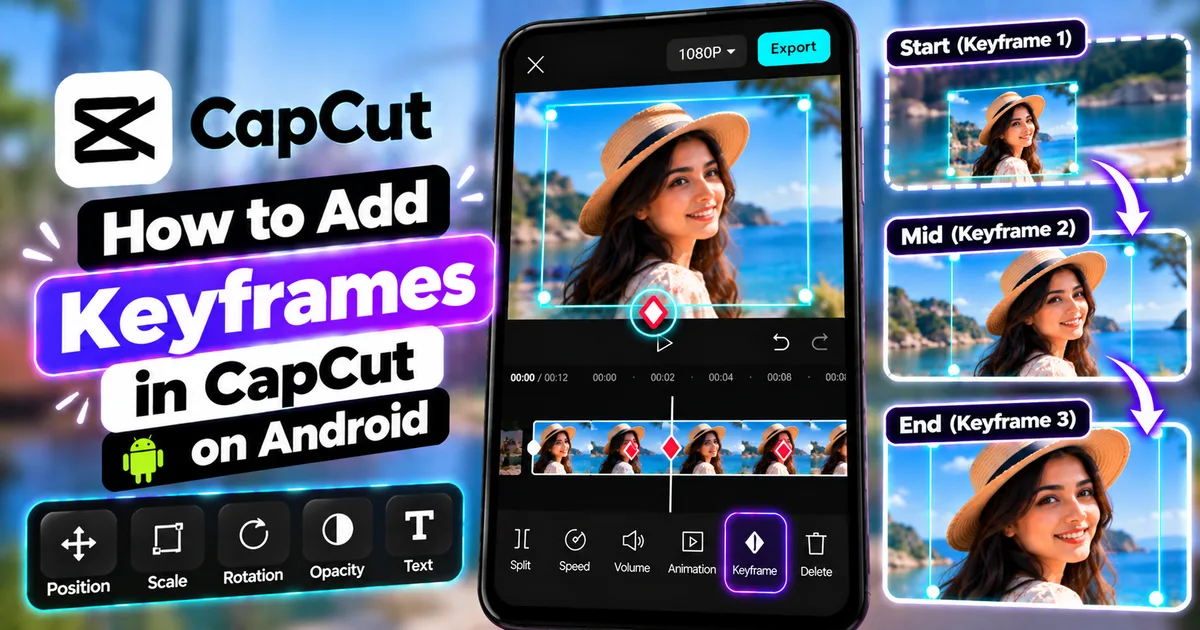
Learn how to add keyframes in CapCut on Android to animate position, scale, rotation, opacity, zoom, text, overlays, and other video elements with smooth movement.
- Source
- Developer
- Package
- CapCut Premium
How to Add Keyframes in CapCut on Android
Want to make text move across the screen, create a smooth zoom, animate an overlay, or make an image move through your video?
Keyframes are one of the most useful tools in CapCut for creating this type of animation.
Instead of applying the same setting to an entire clip, keyframes let you define how a property should change at different points in the timeline. You can use them to control movement, scale, rotation, opacity, and other supported properties.
For example, you can start with a small image in the corner of the screen, move forward in the timeline, add another keyframe, and make the image larger and move it toward the center. CapCut then creates the animation between those points.
In this guide, you'll learn what keyframes are, how to add them on Android, how to animate video clips, text, overlays, images, and other elements, how to control animation speed, and how to fix common keyframe problems.
Quick Answer
To add keyframes in CapCut on Android:
- Open CapCut and create or open a project.
- Add your video, image, text, or other supported element.
- Select the element on the timeline.
- Move the playhead to the point where the animation should begin.
- Tap the keyframe control.
- Move the playhead to another point in the timeline.
- Change a supported property such as position, scale, rotation, or opacity.
- Add another keyframe if required by the current interface.
- Preview the animation.
- Adjust the distance between keyframes to control the timing.
The exact location and appearance of the keyframe control can vary between CapCut versions and editing elements.
What Is a Keyframe in CapCut?
A keyframe marks a specific point in your timeline where an editing property has a particular value.
For example, suppose you want a video to slowly zoom in.
You could create:
Keyframe 1: Normal scale
Keyframe 2: Larger scale
CapCut can then animate the change between those points.
The same basic idea can be used for:
- Position
- Scale
- Rotation
- Opacity
- Zoom
- Text movement
- Overlay movement
- Image animation
- Some effect properties
- Audio volume in supported workflows
Keyframes are especially useful when you want precise control over how something changes over time.
Keyframes vs Normal Editing
Normal editing usually changes a property without necessarily animating it.
For example, if you enlarge a clip and leave it enlarged, the clip can remain at that scale.
With keyframes, you can make the scale change gradually.
For example:
Normal editing:
100% scale → 150% scale
The clip stays at the selected scale after you change it.
Keyframe animation:
100% scale → gradual change → 150% scale
The scale changes over time.
This difference makes keyframes useful for animation.
How to Add Keyframes in CapCut on Android
The following workflow provides a simple starting point.
Step 1: Open CapCut
Launch CapCut on your Android phone.
From the home screen, create a new project or open an existing project.
Step 2: Add Your Media
Choose the video or image you want to animate.
Add it to the project timeline.
You can work with a video clip, photo, overlay, or another supported element.
Step 3: Select the Element
Tap the element on the timeline.
This is important because CapCut displays different controls depending on what is selected.
For example, selecting a video clip may show different controls from selecting text or an overlay.
Step 4: Move the Playhead
Move the playhead to the point where you want the animation to begin.
This is where your first keyframe will establish the starting state.
Step 5: Add the First Keyframe
Look for the keyframe control in the editing interface.
It is commonly represented by a diamond-shaped icon.
Tap it to create a keyframe.
The exact location can vary between CapCut versions and editing contexts.
Step 6: Move Forward in the Timeline
Move the playhead to another point.
The distance between the two points determines how much time CapCut has to animate the change.
For example:
1 second apart: faster movement
4 seconds apart: slower movement
Step 7: Change a Property
At the second point, change the property you want to animate.
For example, you could:
- Move the video
- Increase its scale
- Rotate it
- Change its opacity
- Reposition an overlay
- Move text
- Combine multiple property changes
CapCut can use the changed values to create movement between the keyframes.
Step 8: Preview the Animation
Play the section of the timeline.
Watch how the element moves between the keyframes.
If the movement is too fast or too slow, adjust the keyframe positions.
Step 9: Add More Keyframes
You are not limited to two keyframes.
You can add additional points when you need more complicated movement.
For example:
Keyframe 1 → Keyframe 2 → Keyframe 3 → Keyframe 4
This can create a sequence such as:
Start → Move right → Move up → Zoom in → Return
Use additional keyframes only when they improve control.
Too many keyframes can make an animation difficult to manage.
How Keyframe Animation Works
A simple keyframe animation has two important components:
Starting State
The first keyframe defines where the element begins.
For example:
- Scale: normal
- Position: left side
- Rotation: 0°
- Opacity: 100%
Ending State
The later keyframe defines where the element should be at that point.
For example:
- Scale: larger
- Position: center
- Rotation: 10°
- Opacity: 100%
CapCut then creates the movement between the states.
The result could look like:
Small + left → gradually larger + center
This same principle works for many different animations.
How to Animate Position With Keyframes
Position animation moves an element from one location to another.
For example, you can make an image move from the left side of the screen to the right.
Basic Workflow
- Add the image or video.
- Select it.
- Move to the starting point.
- Add a keyframe.
- Place the element at its starting position.
- Move forward in the timeline.
- Add another keyframe or change the position at the new point.
- Move the element to its new position.
- Preview the movement.
The element should now move between the two positions.
How to Move an Image Across the Screen
Keyframes are useful for creating simple image animations.
For example:
Left side → Center → Right side
You can create three keyframes.
Keyframe 1
Place the image on the left.
Keyframe 2
Move forward and place the image in the center.
Keyframe 3
Move farther forward and place the image on the right.
CapCut can then animate the image through those positions.
This technique can be useful for:
- Presentations
- Photo videos
- Tutorials
- Social media videos
- Product demonstrations
- Storytelling
How to Animate Scale With Keyframes
Scale controls how large or small an element appears.
A common example is a gradual zoom.
Basic Workflow
- Select your video or image.
- Move to the starting point.
- Add a keyframe.
- Keep the original scale.
- Move forward.
- Add another keyframe.
- Increase the scale.
- Preview the result.
The footage should gradually become larger.
For a detailed zoom tutorial, see our guide on how to add a zoom effect in CapCut on Android.
How to Create a Zoom-In Animation
A simple zoom-in can be created using two keyframes.
For example:
Start: Normal size
End: Enlarged
The longer the distance between the two keyframes, the more gradual the movement can appear.
A short distance can create a faster zoom.
A longer distance can create a slower zoom.
How to Make the Zoom More Natural
Avoid making the scale change unnecessarily large.
A subtle zoom can work well for:
- Talking-head videos
- Travel videos
- Tutorials
- Storytelling
- Product videos
- Photo slideshows
How to Create a Zoom-Out Animation
You can reverse the process.
Start with a larger scale and finish with a smaller scale.
For example:
Large → Medium → Normal
This can create a camera-like pull-back effect.
You can also combine zoom-in and zoom-out movements in the same clip.
How to Animate Rotation With Keyframes
Keyframes can also be used to animate rotation where the selected element supports it.
For example:
0° → 15° → 0°
This can create a gentle movement.
Or:
0° → 360°
can create a full rotation when supported by the current editing controls.
Use rotation carefully.
Large or fast rotations can make the video difficult to watch.
How to Animate Opacity With Keyframes
Opacity controls how visible an element is.
A common animation is:
100% → 0%
This can make an element gradually disappear.
The reverse:
0% → 100%
can create a gradual appearance.
Opacity animation can be useful for:
- Logos
- Text
- Overlays
- Images
- Titles
- Intro graphics
- Outro graphics
The available opacity controls can vary depending on the selected element and CapCut version.
How to Animate Text With Keyframes
Text can be animated in several ways.
For example, you can make text:
- Move from one side to another
- Grow larger
- Shrink
- Rotate
- Fade
- Move upward
- Move downward
Basic Text Movement
- Add text to the project.
- Position it where you want the animation to begin.
- Add a keyframe when the relevant control is available.
- Move forward in the timeline.
- Change the text position.
- Preview the movement.
This can create a custom text animation.
CapCut also has built-in text animations, so keyframes are most useful when you want more control over the movement.
Keyframes vs Text Animations
These are not exactly the same.
Text Animations
Built-in animations provide predefined movement styles.
They can be quick to apply.
Keyframes
Keyframes give you more control over where and when the change happens.
For example, instead of applying a preset movement, you can decide:
Start at 1 second → move at 2 seconds → stop at 4 seconds
This makes keyframes useful for custom animations.
How to Animate an Overlay With Keyframes
CapCut overlays can also be animated.
First, add an overlay to your project.
Then select the overlay and create the desired keyframe movement.
For example:
Small overlay in corner → larger overlay in center
or:
Left → center → right
You can learn more about adding overlays in our guide on how to add overlays in CapCut on Android.
How to Animate a Picture-in-Picture Video
A picture-in-picture video can be animated using keyframes.
For example, you could start with a small reaction video in the corner and gradually move it toward the center.
Basic Workflow
- Add the main video.
- Add the second video as an overlay.
- Select the overlay.
- Set its starting position and size.
- Add a keyframe.
- Move forward.
- Change the size or position.
- Preview the animation.
This can create a dynamic picture-in-picture effect.
How to Create Multiple Keyframe Animations
You can animate several properties in the same section.
For example:
Position + Scale + Rotation
An image could:
- Start small
- Move toward the center
- Grow larger
- Rotate slightly
This can create a more dynamic animation.
However, combining too many movements can make the result look excessive.
Start with one property and add another only when it improves the edit.
How to Make Keyframe Animation Faster
If an animation is too slow, move the ending keyframe closer to the starting keyframe.
For example:
Start at 1 second
End at 5 seconds
creates a longer animation interval than:
Start at 1 second
End at 2 seconds
The second setup gives the change less time to happen.
How to Make Keyframe Animation Slower
Move the ending keyframe farther away.
For example:
Start at 2 seconds
End at 3 seconds
will generally create a faster movement than:
Start at 2 seconds
End at 7 seconds
Preview the result at normal playback speed before deciding which timing feels right.
How to Create a Smooth Keyframe Animation
Smooth animation depends on both the amount of change and the time available for that change.
Try these techniques.
Use Moderate Movement
Avoid moving an element across the entire screen in a fraction of a second unless you specifically want a fast effect.
Use Enough Time
Give gradual movements enough timeline space.
Use Fewer Keyframes
Start with two keyframes.
Add more only when you need additional control.
Preview Frequently
Play the animation at normal speed rather than judging it only while dragging the playhead.
Keep the Subject in Frame
If you animate video position or scale, make sure important subjects remain visible.
How to Create a Moving Camera Effect
Keyframes can simulate camera movement.
For example:
Wide shot → gradual zoom → slight horizontal movement
You can combine scale and position changes to create this effect.
This can be especially useful when editing:
- Talking-head videos
- Landscape footage
- Product videos
- Static images
- Presentations
- Travel footage
The effect does not create new camera footage. It changes the position or scale of the existing media inside the frame.
How to Animate a Photo
A still image can be made more dynamic with keyframes.
For example:
Wide image → slow zoom → slight movement toward subject
This can create a photo-video effect similar to a camera moving across a still photograph.
You can use this technique for:
- Photo slideshows
- Travel memories
- Family videos
- Presentations
- Product showcases
- Storytelling
How to Use Keyframes With Freeze Frames
A freeze frame can be combined with keyframe animation.
For example:
- Create a freeze frame.
- Select the frozen section.
- Add a starting keyframe.
- Move forward.
- Increase the scale.
- Preview the animation.
This creates a gradual zoom toward the frozen moment.
See our guide on how to freeze a frame in CapCut on Android.
How to Use Keyframes With Masks
Masks can also be animated using keyframes where the current CapCut version supports the relevant controls.
For example, a mask can gradually move or change size.
This can be useful for:
- Revealing an image
- Following an object
- Creating a transition
- Blurring a moving area
- Creating visual effects
See our guide on how to use masks in CapCut on Android.
How to Use Keyframes for a Moving Blur
If you want to blur a moving face or object, a static blur may not remain aligned with the subject.
A keyframe-based workflow can allow the blur mask to move as the subject moves.
For example:
Keyframe 1: Mask over subject
Keyframe 2: Subject moves → mask moves
Keyframe 3: Subject moves again → mask moves again
CapCut can interpolate the movement between these points.
For privacy-sensitive content, always watch the entire video before exporting to confirm that the intended area remains covered.
How to Animate Audio Volume With Keyframes
Keyframes can also be useful for audio volume in supported CapCut mobile workflows.
For example, you can gradually reduce background music when someone starts speaking and raise it again afterward.
A basic pattern is:
Normal volume → lower volume → normal volume
This can make voice-over sections easier to hear without completely removing the music.
The exact audio keyframe controls can vary by CapCut version.
Keyframe Animation vs Transition
Keyframes and transitions serve different purposes.
Keyframes
Keyframes animate properties within an element or clip.
For example:
Scale 100% → 130%
Transitions
Transitions are used between clips.
For example:
Clip 1 → Transition → Clip 2
You can use both in the same project.
See our guide on how to add transitions in CapCut on Android.
Keyframe Animation vs Built-In Animation
CapCut's built-in animation presets can provide ready-made movements.
Keyframes provide more manual control.
Use built-in animations when:
- You want a quick result
- A preset already matches your idea
- You do not need exact timing
Use keyframes when:
- You want custom movement
- You need precise timing
- You want several movement stages
- You need to synchronize movement with music
- You want to animate position or scale manually
Both approaches can be useful.
Common Keyframe Problems in CapCut
Keyframe Button Is Missing
First, make sure you have selected the correct clip or element.
Different elements expose different controls.
Also check whether the current CapCut version has changed the location of the keyframe control.
Keyframes Are Not Creating Movement
Check whether the property actually changes between the keyframes.
For example:
Keyframe 1: Scale 100%
Keyframe 2: Scale 100%
There may be no visible scale animation because the values are identical.
Try changing the second value.
Animation Is Too Fast
Move the ending keyframe farther away.
Animation Is Too Slow
Move the ending keyframe closer.
Object Jumps Instead of Moving Smoothly
Check the keyframe positions and property values.
A large change between very close keyframes can create a fast movement.
Also check whether additional keyframes are causing unexpected changes.
Text Does Not Move as Expected
Make sure the text element is selected and that you are changing the appropriate property at the correct timeline position.
Overlay Moves Out of the Frame
Reduce the movement or add additional keyframes to keep the overlay inside the visible area.
Zoom Becomes Too Strong
Reduce the scale change at the later keyframe.
Animation Looks Different After Export
Preview the exported file rather than relying only on the editor preview.
If the exported result differs from the editor, try refreshing the preview, clearing temporary cache, restarting CapCut, and testing a short export.
How to Fix CapCut Keyframe Preview Problems
Sometimes the timeline or preview may not immediately display an adjustment correctly.
CapCut's current troubleshooting guidance recommends several general steps for mobile editing mismatches, including refreshing the preview, clearing cache on Android, restarting the app and device, and exporting a short test clip. :chatgpt-content-reference{index="1"}
Refresh the Preview
Move to another editing section and return to the preview.
This can force the interface to refresh.
Clear Cache
On Android, a typical path is:
Settings → Apps → CapCut → Storage → Clear Cache
The exact menu names depend on your phone.
Restart CapCut
Close CapCut completely and open it again.
Restart Your Phone
If the problem continues, restart the Android device.
Export a Short Test
Instead of exporting the entire project, test a short section.
This can help determine whether the issue is only a preview problem or affects the actual rendered video.
Tips for Better Keyframe Animations
Start With Two Keyframes
Two keyframes are enough for many basic animations.
Change One Property First
If you are learning keyframes, start with position or scale.
Once you understand the basic workflow, combine properties.
Use the Timeline Carefully
Small changes in keyframe position can significantly affect animation timing.
Don't Overuse Keyframes
More keyframes do not automatically mean better animation.
Match Movement to the Video
Fast content can work with faster movement.
Slow storytelling often benefits from more gradual movement.
Keep Important Subjects Visible
Always watch the entire animation.
Preview at Normal Speed
Scrubbing can make movement appear different from normal playback.
Use High-Quality Source Media
Large scale changes can make low-resolution footage look soft.
Save Your Original Project
Keep an editable version so you can change the animation later.
Frequently Asked Questions
What are keyframes in CapCut?
Keyframes mark points in a timeline where an element has specific property values. CapCut can use those points to create changes over time.
How do I add keyframes in CapCut on Android?
Select a supported element, move the playhead to the desired point, use the keyframe control, move to another point, and change the property you want to animate.
What can I animate with keyframes in CapCut?
Depending on the selected element and current CapCut version, keyframes can be used for properties such as position, scale, rotation, opacity, and supported audio volume controls.
Can I use keyframes to zoom in?
Yes. A common workflow uses one keyframe at the original scale and another at a larger scale.
Can I use keyframes to zoom out?
Yes. Start with a larger scale and reduce it at a later keyframe.
Can I move text with keyframes?
Yes, where the current text-editing controls support keyframe animation. You can use keyframes to create custom text movement.
Can I animate an overlay with keyframes?
Yes. Keyframes can be used to control movement and scale of supported overlay elements.
Can I animate a photo in CapCut?
Yes. You can use keyframes to change a photo's scale and position over time.
How many keyframes can I use?
You can use multiple keyframes within a clip. The practical number depends on the complexity of the animation. Start with a small number and add more only when needed.
Why is my CapCut keyframe animation too fast?
The keyframes may be too close together. Move the ending keyframe farther away to give the animation more time.
Why is my keyframe animation too slow?
Move the ending keyframe closer to the starting keyframe.
Why isn't my keyframe creating movement?
Check whether the property actually changes between the keyframes. If both keyframes have the same value, there may be little or no visible movement.
Why can't I see the keyframe button?
Select the correct video, image, text, overlay, or other supported element. The available controls depend on what is selected and can change between CapCut versions.
Can keyframes animate rotation?
Yes, where rotation is available as an animatable property for the selected element.
Can keyframes animate opacity?
Yes, where opacity is available for the selected element.
Can keyframes move a blur mask?
Keyframes can be used to animate mask position in supported workflows, which can help keep a blur aligned with a moving subject.
Can keyframes control audio volume?
CapCut mobile supports volume keyframes in supported workflows, allowing audio levels to change at specific points in the timeline.
Do keyframes work on Android and iPhone?
CapCut supports keyframe-based animation on its mobile apps, although the exact controls and interface can vary between versions and platforms.
Are keyframes the same as transitions?
No. Keyframes animate properties within an element or clip, while transitions are used to connect clips.
Are keyframes better than built-in animations?
They serve different purposes. Built-in animations are faster to apply, while keyframes provide more direct control over custom timing and movement.
Can I use multiple properties with keyframes?
Yes, where the selected element supports them. For example, you can combine scale and position to create a moving zoom.
Final Thoughts
Keyframes give you much more control over animation in CapCut than simply applying a preset effect.
The basic concept is simple:
Choose a starting point → set the starting state → move forward → change the property → preview the animation.
Once you understand that workflow, you can use keyframes for much more than zoom effects.
You can animate position, scale, rotation, opacity, text, overlays, images, masks, and supported audio controls.
Start with two keyframes and one property. For example, move an image from left to right or gradually increase the scale of a video.
Once you are comfortable with that process, add additional keyframes and combine properties to create more advanced movement.
Remember that timing is just as important as the amount of movement. Two identical animations can feel completely different when their keyframes are placed at different points in the timeline.
For the cleanest results, keep movements purposeful, avoid unnecessary keyframes, preview your animation at normal playback speed, and check the exported video before publishing.
Keyframes are one of the foundations of custom animation in CapCut, and learning them makes many other editing techniques—such as zooming, moving overlays, animating masks, and creating dynamic text—much easier to understand.
Related Articles

How to Fix CapCut Video Lagging After Export on Android
Fix CapCut video lagging after export on Android. Learn how to troubleshoot choppy playback, frame-rate mismatches, heavy effects, storage issues, and export settings.
GetApkFree Team

How to Fix CapCut Preview Not Matching Export on Android
Fix CapCut preview not matching the exported video on Android. Troubleshoot missing effects, text, transitions, timing, colors, and rendering differences.
GetApkFree Team

How to Fix Couldn't Apply AI Background in CapCut on Android
Getting "Couldn't Apply AI Background" in CapCut on Android? Check usage limits, clip selection, video quality, app updates, and practical troubleshooting steps.
GetApkFree Team

How to Fix CapCut Effects Not Applying on Android
CapCut effects not working on Android? Check clip selection, effect layers, timeline timing, conflicting adjustments, and app performance with these practical fixes.
GetApkFree Team